Winter is the Warmest Season
Baby, it's COLD outside! But it is always warm at Grandma's kitchen table! Here are a few things to keep us busy there!
My Grands don’t seem to mind the cold, but some days it’s just too cold to play outside (this morning it was -2!). One of our best memories was when Grandma brought the snow inside! I have these fab $2.99 IKEA trays to contain our messes, and scooped up snow with them, but you could even use a cake pan. Add tiny construction vehicles and dinos and they’ll play for hours. Melting brought about a whole new dimension; when there is too much water, dump it in the kitchen sink and start over with a new scoop of snow.


Minnesota author, John Coy, has a new book, So Cold!, with a father and son who practice science experiments using household objects outside on a cold, snowy day. John is the Grandfather of twin boys, so he knows the drill! What happens when boiling water is flung into the air? Or when maple syrup is poured on clean snow? The night before they left a banana outside: now it’s frozen solid. Can they can use it like a hammer? Designated for ages 3-7, but I think older kids would try these experiments too.
Check out Lauren Stringer's book Winter is the Warmest Season from this affiliate link or your library- its inviting scenes, poetic text, and gorgeous illustrations celebrate all the wonderful things that make winter the coziest time of the year. The beautiful visual narrative follows a boy and his family through a day of hot breakfasts, steaming afternoon cocoa, and a festive candlelit party before bed.


HOT CHOCOLATE MIX Ingredients—2 cups confectioners’ sugar, 1 cup unsweetened cocoa powder (preferably Dutch process), 2 1/2 cups nonfat dry milk powder, 1 teaspoon fine-grain salt, 2 teaspoons cornstarch, Hot milk or water to serve. Instructions—Combine the confectioners’ sugar, cocoa, milk powder, salt, and cornstarch. To serve: Shake the mix and then place 2 tablespoons in a mug and add about 2 ounces hot water or milk. Stir to combine. Fill the mug with more hot water or milk. Enjoy. *Alton Brown recommends a pinch of cayenne pepper for an extra depth of flavor(a pinch won’t make it spicy).

FEED THE BIRDS Supplies—3/4 cup birdseed, 3 tablespoons flour, 6 tablespoons water, Heart-shaped cookie cutter, Vegetable oil, Foil, Cookie sheet, Drinking straw, Ribbon. Instructions—Mix together birdseed, flour, and 2 tablespoons water. Spray or wipe the cookie cutter with oil and place it on a foil-covered cookie sheet. Pack the mixture into the cutter, inserting half a straw near the top to create a hole for hanging. Bake the biscuit (with the straw) in a 170-degree F oven until the biscuit is hard, about one hour. Let it cool. Makes two 3-inch biscuits or a single 4-inch biscuit. Remove the straw, thread a ribbon through the hole, and hang outside in a sheltered spot. Great gift for birds and bird-loving friends! Makes a great valentine! Teach the Grands about these 15 common birds.

RAINY DAY DIRT Ingredients—You might have these on hand! 4 Cups flour, 1/2 Cup baby oil Instructions—Mix well to make a silky, mold-able, nice smelling "moon sand." I bought a low-sided plastic, lidded storage container, and a set of smallish construction vehicles to be able to pull out as an "occasion," but you could also put it in a 9x13 baking pan, and use whatever vehicles the child has on hand. We like lots of plowing and dumping abilities. This mixture keeps well to bring out again and again, but be prepared for some sprinklings outside the box (to me, worth the 1 1/2 hour of play). I just keep the play to sitting at the table to keep it contained a bit.
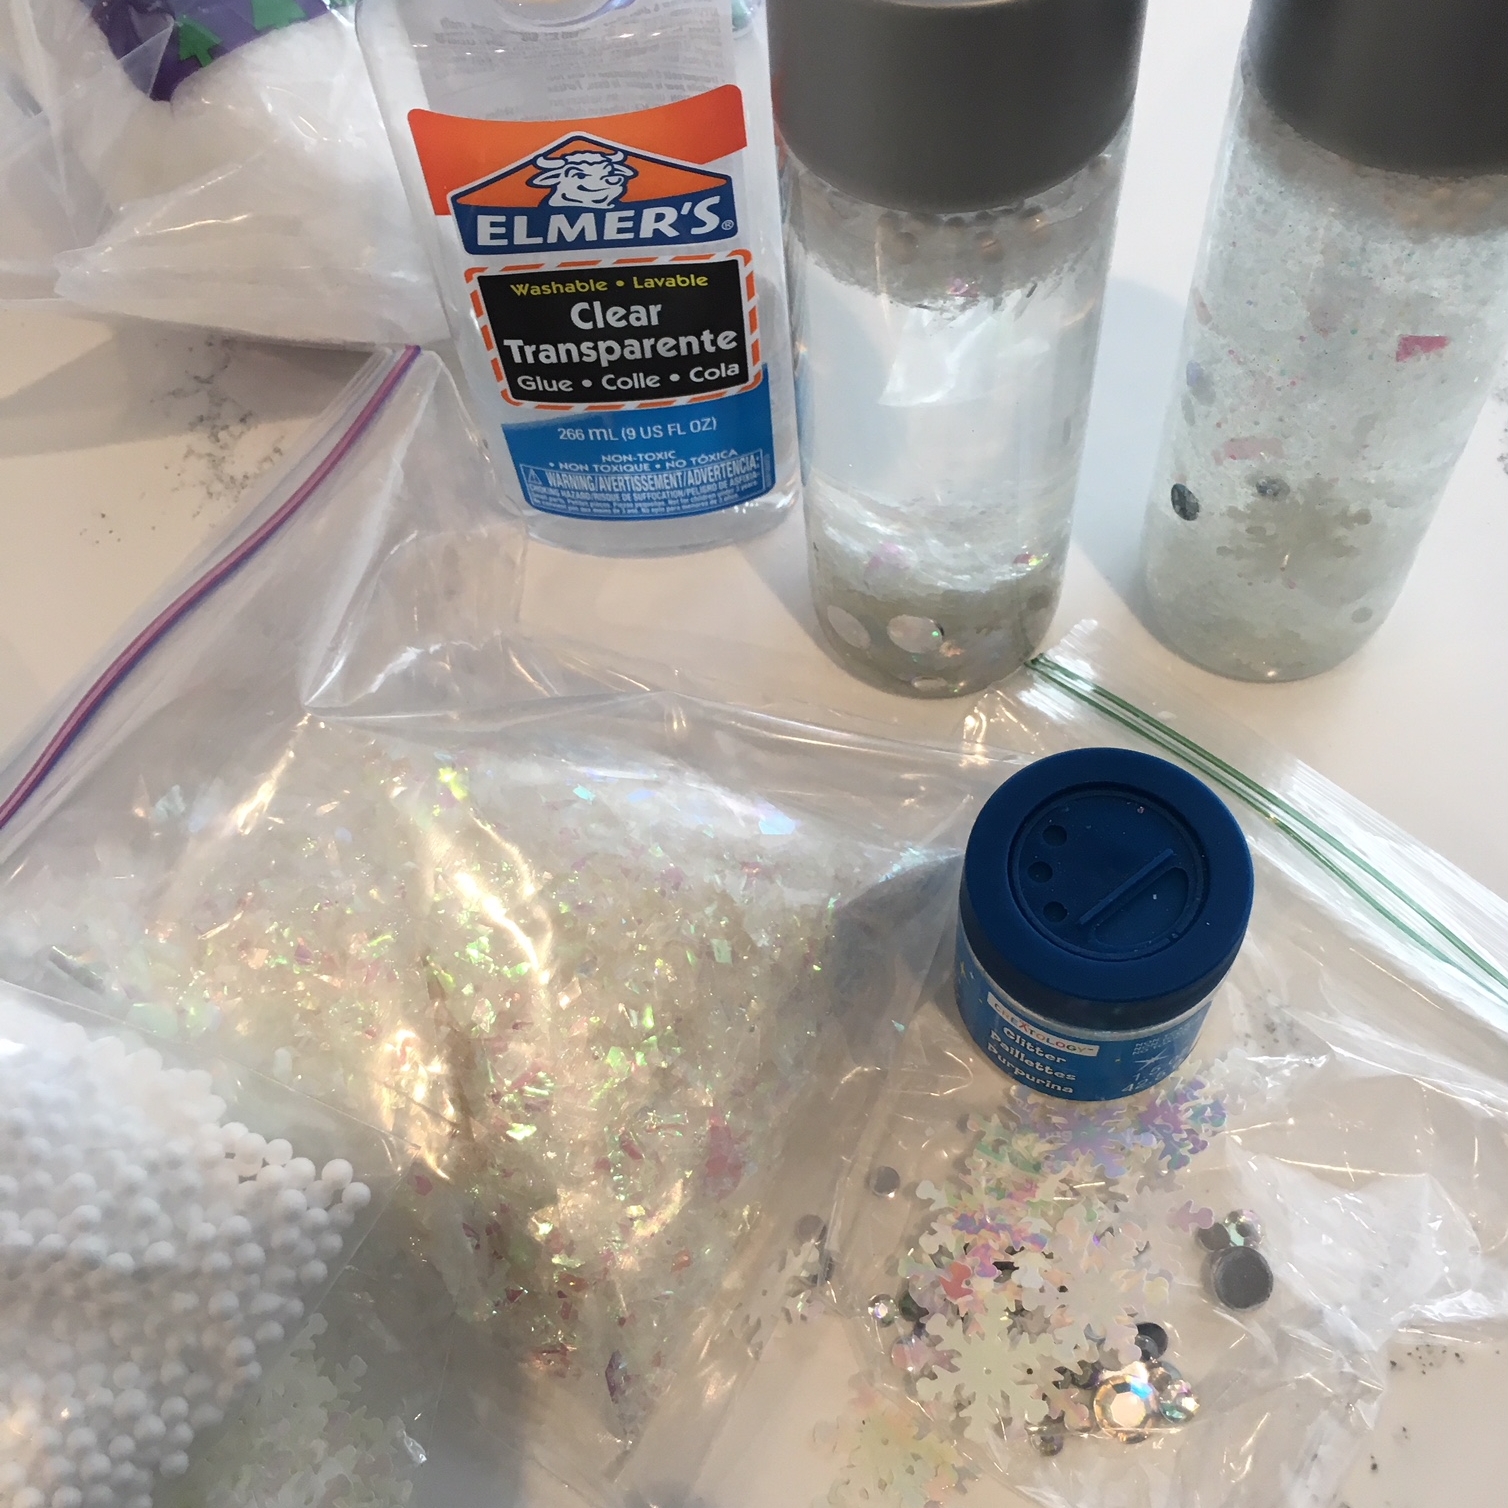
CALMING JAR SNOW GLOBE—Grab some snow-related craft supplies at the after-Christmas sales. Ingredients –I tried white glitter, cellophane snow, white fake snow, snowflake glitter, diamond-like sequins, and tiny Styrofoam balls (which were the least successful in the suspension). You will also need clear glue and canning jars or Voss plastic water bottles (unbreakable). Instructions—Fill your bottle about a third of the way with clear glue, add lots of “snow”(2-3 tablespoons) and fill another third with warm water. Close and shake to see if you might want more glitter and such. Finish with warm water to fill, and seal the jar lid with glue. So mesmerizing, even for babies! We have also made a beach version with blue glitter and plastic fish.

SOFT M&M COOKIES - Baking is always a Grand idea! Ingredients - 2C flour, 1 3.5oz. box vanilla instant pudding, 1/2tsp baking soda, 1C softened butter, 1C packed brown sugar, 2 eggs, 12oz. pkg M&Ms, 1C chopped nuts (optional). Directions -Combine flour, pudding mix, and baking soda and set aside. In a large bowl, combine butter and brown sugar; beat until creamy and smooth. Beat in eggs. Gradually beat in flour mixture. Stir in candy and nuts. Drop slightly rounded tablespoonfuls onto ungreased cookie sheets. Bake at 350 degrees for 10-12 minutes.RECIPE CARD PRINTABLE

PAPER PLATE SNOW GLOBE—We have a lot of "snow" products left from the calming jars, so we used them for this project as well (the tiny Styrofoam balls worked better here). I purchased fun paper plates and slightly smaller clear plastic plates from Target, but older children could color images on any paper plate. My Grands are toddlers, so I cut out fun photos, let them use the glue stick to attach the photo to the plate, they added varieties of snow, and I used clear glue to attach the clear plastic plate, and strips of package tape for security! They are still playing with them!